Latest Entries »

Intro to Astronomy

Well, its been awhile.

Anyway, a few weeks ago I stumbled upon the fact that several schools and various programs got together to give free college level instruction online to anyone who wishes to sign up for it. Figured, what the hell, I got nothing to lose but time and sleep. Years of my life towards frustration and the occasional thoughts of mass hysteria that usually follow close to a deadline that I am unlikely to adhere too. Not to mention the time spent wondering if I am spending my time in the most cost efficient manner.

Should I bother doing this if I am to get nothing out of it in the long?

Isnt the fact that I shall be enriching my existence enough to make the time worthwhile?

But you need to earn money in the long run, how do you plan on making money out of the knowledge you have gained?

Maybe I wont make any money out of this, but I shall enjoy it none the less! Plus your face is dumb and you need to quit making me get off topic!

Ahh, the fun parts of a inner monologue. They eventually make people look at your crazy. Alas, I have managed to make it through week 1 of this 9 week course. Am I better for it? Not sure yet, my mind is still trying to do fog from all the years of no use. 

So what have I learned so far you ask. 

First and foremost, I suck at math. No, scratch that. I really suck at math. No, still not adequate. If sucking at math was an Olympic sport, I would have won gold 12 times over, I could win the Nobel Peace prize for sucking at math.

Needless to say, I go from this being the hardest math I need to use on a daily basis: 

10 dollars minus 5 dollars is equal to = 5 dollars in change. Thanks for shopping here! Dont let the door hit you on the way out. 

To needing:

ST = LT +/- D x 4m 
ST = Sidereal Time
LT = Local Time
D = Days Later

This is to figure out…. something. Though I figured out the answer to the question I am still not sure what happened.

Or this equation

Theta = 206,265 * Linear Diameter/Distance

Seems simple but it took me 6 hours to figure out one question that dealth with this equation… and I think thats only because I seen other students sort of spell out how it got figured out… Soo…

I did learn though that in sometime over a billion years (forget exact amount right now and dont wish to look it up) that the Andromeda galaxy is going to crash into the Milky Way galaxy. Should be a fun turn of events for our future selves.

Beyond this though, what I thought was alot about space, turns out to be alot of math and alot of science. Upset? Maybe a bit. Though, still enjoying learning this more then I ever did trying to figure out math for the schooling I paid for. 

The internet has shown me so many more free resources though to help me learn the things I need. Found a site that deals in strictly learning math. 

http://www.khanacademy.org/


Will be using that site alot in order to refresh my skills in math that I let rust years ago. Assuming the dust bunnies have not eaten all semblance of the math knowledge I used to have, I should be able to catch back up somewhat fast. Though we shall just have to wait and see.

Now I am off to get my eyes to stop being crosseyed from all the confusion. Time to rest my mind and watch or do something that requires no thinking.

Happy Turkey Genocide Day

Well, its that time of the year. I just wanted to wish you good luck killing all those turkeys today. Just been listening to some game soundtracks and other stuff 😀 Videos posted below for those interested.


http://www.youtube.com/watch?v=ehAZhUGIW-A&feature=related

Room of Angel – Akira Yamaoka


http://www.youtube.com/watch?v=bpI-KeK-PQg

Nameless Song – Dark Souls Soundtrack


http://www.youtube.com/watch?v=mjWs-TkjaaQ

Dead Island Theme song


Now a bit more traditional…

http://www.youtube.com/watch?v=sn-kBXqVKzw

Overdone – Ludo


Enjoy 🙂

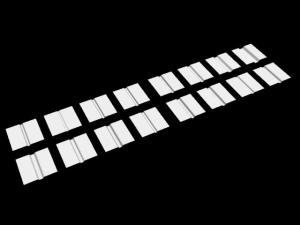
A practice sessions which I am going to be trying to keep up with. With my current track record I am sure I will fall off the band wagon sometime within the first week, probably within the first 3 or 4 days or so. Anyway, using Sub-d modeling basics for this. Basically, going to be doing the exact same thing for around 16 times 🙂 Sounds like fun eh?


I am hoping this will help me learn the techniques, instead of just doing it once and thinking I have it memorized now, till I come back a few days later and completly forget how its done.

Anyway….

Here is the results of the practice…. This first one is very basic. As the days drag out, I shall be doing this one plus some of the new ones that I add on to it.


Yes, I ratted myself out. I start alot more then I finish. So far I think my success at failure is something around 100%. I got several projects in the works though this one I have some incentive to actually complete. Its for halloween 🙂

Utinni!!


Yes, I am being a Jawa. Not only am I being a jawa though, I am being a Jawa that has been plagued with gigantism. I have been ostracized from the clan which is why I am dressing alone. I am a wondering Jawa. Well, nearly. I will likely just have the cape and hood for this costume (so I will at least look like a Jawa) as well as the eyes. The cloth material, sadly, I just dont have the time to learn and create it myself this time. So we have asked one of my wifes coworkers to create it for me. Now the eyes is what I am working on, and as luck would have it, I think I have it pretty figured out.


For the basic mask I shall be using this:

http://www.spirithalloween.com/product/blank-male-mask/

Very simple and basic mask that I can cut up and get rid of the mouth portion of it. I just wont need that portion of which I shall use a deep black cloth to cover up the lower part of my face. On this mask I shall also be attaching some elastic bands of some sort to wrap around my head to hold it into place. Attached to this will also be black cloth wrapping up over the head as well and attaching to the back of the elastic bands via some sort of glue or so. This will hide my face in almost pure blackness 🙂

Now, the eyes. They will be a simple yellow/orange LED light. Pretty simple setup actually, will just attach a 9v battery, a resistor, and a LED light together and we are set. In addition thought to this setup, I want to try to attach a simple on and off switch so that I can turn the lights off when I am not using them. This who contraption will be attached to the mask as well, the battery, resistor and some wire will be ran along the elastic band and attach to the LED light that will be embedded in the mask just below the eyes of the mask. Now, I do still need to figure out something to attach to the LED base in order to sort of focus the light out a bit, think some concave piece will work but this is something I need to work on yet. Once all this is attached though, the head piece is pretty much complete and in theory I shall look similar to the picture above 🙂

Anyway, I hope to have this completed within a week. So looking forward to seeing something here soon 😉

As for Project Force Pike, it has hit a hurdle, I have some of the pieces I need, but one of the main pieces I had gotten is a bit to big and I am having to go around looking for a replacement for it, so this may take some time which for the time being, I am putting this one on hold for now.

3d Project, that is on hold till my new hopefully laptop arrives in the mail to replace this poopy one that I am on now. So hope that arrives in the next week or so as well 🙂

So…

What to do, what to do? Its been far to long since I posted here. Sadly alot of things have happened and I have just been unable to keep up with this. No fault of any of you, all zero of you, my regular readers, if not for you I would not even be here now. Glad I have something to keep you interested 🙂

Anyway, so back to the original question, what to do?

Force Pike project has come to a standstill. Wanting to also make myself some chain mail armor. my 3d work has been non existent this whole year almost. I really need to fix that, yet I have no motivation to hardly bother anymore. Been doing alot of reading, yet really dont have the urge to write a quick review for those either lol. Oh well.

Time to hope to turn things around. The question then becomes, will I? A great question that is. So if you go several months without seeing anything updated here, then odds are you know the answer.


Otherwise,

TTFN 🙂

Been awhile since I have posted about this. I had been having issues finding cheaper solutions for a couple of the pieces I had been needing to buy. All three were from amazon and with the shipping cost on each one, would have put the cost of those three pieces up in the range of the 20 dollar mark, which would in turn put this project far over budget. So I have spent the last few weeks digging around and just the other day manage to find a site that has them for cheaper.

Then there are some other things in the works which may make the overall cost of the project drop farther as well. So we shall see how things go over the next couple of weeks. Once I see what pieces I have and what needs to be done and bought still, I shall begin ordering in earnest and preparing the pieces for the eventual coupling and paint job that will need to be done.

For those who might be interested in creating your own:

Shopping List – all the parts I have found links for so far (minus a few smaller bits that you can get for cheap at any hardware store)

Original Plans – This is where I got my idea to make this from, as well as the original shopping list of parts as well. From here is where I started shopping around for the pieces.

Now once I begin piecing this together I shall be posting pictures of the process as well as I go. So we shall get a detailed description of the process as well once I get to that point.


On a side note, I am a bit jumping the gun here as well, but I have already decided what the next project will be once I create the force pike, and surprisingly it is non star wars related. I am planning on making my own Telescope and mount. More on that though once the force pike is completed 😀


3D – Project Clock

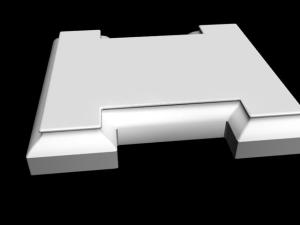
After about 45 minutes worth of work, I had to finally force myself away by beating myself senseless. Anyway, I managed to get the base done for the most part, I got a bit of clean up to do with some of the edges, but I am unsure how to proceed there at the moment. Taking my time to step away from this and shall be back hopefully in about an hour. Here is a image on to where I am currently.


***UPDATE 6:47 Eastern 6/26***


A bit more work on this, I have changed the details slightly on the face, not sure if I like it yet so might redo it later. Anyway, just posting to keep an update stream going.


Having gone to school for 4 years to get into the field of 3D for a job, I have gone almost 5 months without touching any of my 3D related programs. I am a bit disappointing, but I honestly burnt myself out on them, not to mention the result of being unsuccessful finding a job that dealt with it as well as not feeling my skills were up to spec where I wanted to be. I have had computer issues galore, the programs themselves have been doing funny things, life has required me to not focus to much on it as well. I have an excuse for everything, but in the end, I was just burnt out with it and didnt feel I should continue on the path I had chosen. It had gotten me nowhere, but alas, its what I enjoy and I have been feeling that itch to try again.

Brings me to now. I am planning on retrying again. I have many training videos that I plan on rewatching, though I am planning on changing my workflow a bit here. Before, I would work almost non stop on something, sometimes literally for 8 hours a day straight. I realize how wrong I was to do this. This was the way I burnt myself out, all work and no play makes jack a dull boy. So I am switching things up a bit. I am planning on working in maybe half hour to an hour long increments. The length shall be dependent on how intense of a time I am having with the project, the harder and more focused I have to be on it, the sooner I shall take a break. Breaks lasting for about the same time I work on something, thinking at most to be a half hour or 45 minutes.

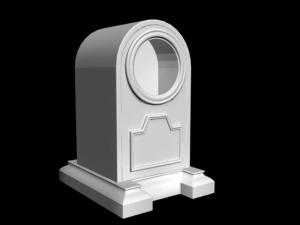
Anyway, back to what I plan on doing. I am once again going to be delving back into Architectural Visualization. I shall be starting small with a simple clock of sorts. This will be the type of clock you would see in a study, library or even on a shelf in the living room. One similar to the photo below.

I have made some very general notes on the specific sections that will need to be modeled separately for this to be completed in a timely manner.

Starting at the bottom. The part colored in blue is a very simple base which can be easily copied over to create the other side. With that created, its an easy enough fix to cut those roughly in half, edit the inside edge shapes a bit and extrude and weld the center section between them which will give me the over all base.

Now the overall shape of the main clock box will be a simple box with a rounded top. Could create this a few ways, hinge from edge on the top, or just model a cylinder and delete half of it. Overall a very very basic shape.With the basic box created you then need to go and inset the edges a bit to give you the outer shell of this. Then extrude or delete the middle edges as it is a door for the front and is not needed at all. Or better yet, just detach that face and use it for the door mesh. Just would need to recreate the edge faces for the surface then inset and bevel out the lower shape and the actual clock edges. The detail work is mostly spline work and should not take too long once the shape is drawn out. Its at this point I might take some liberty with the design and change it up slightly, shall see once I get there.

As for how long this will take to get done? To hell if I know, I have tried created time lines in the past and something always goes wrong, so this piece will get done when it gets done. As I work on it I shall post blogs about the production of it, as this will be an addition to some models that I already have up for sale. Not sure if this will be a free model or if I will charge for it or not. I will decide that once I figure out if I like the work I had done or not. If I dont like it I will likely just make it a free model for download via my turbosquid account. If I do like it, then I shall work out a price point I think is fair and work from there.

This shall be modeled to scale, as such, the dimensions are on the image file for the notes.

Look for more here soon! (hopefully)

Ok, now before anyone says, “Hey, I know how to do this, there is a tool in photoshop for this! So why are you making this a tutorial?” Well simply put, the tool in my opinion does a decent job at removing red eye. True. I have also noticed, which perhaps is cause by my inexperience with the tool at hand, that it leaves a slight red ring at the edge of the eye that I never liked before. Also, once its done, there isnt a way to go and undo those down the pipeline if you so wished to do so. Either way, I am putting this up here as a reference more for myself as I sometimes will go months without seeing a Red eye in the pictures that I take, as such, I will often forget the exact procedure for doing so during that time.

Anyway, here we go…

Step 1. Open Photoshop, its self explanatory I know, but I am sure there are always those who would be lost afterwards if I did not post this step. Yes there are people that stupid out there, ask anyone who has ever worked tech support or phone service if you dont believe me.

Step 2. Open the image that has the red eye you wish to remove. For things like this I prefer to be zoomed in pretty close to the subject as most of the things you will be doing are over a very small space overall and you will need to get in close to be as accurate as possible.

The image that I have opted to use for this. This is a small crop of a larger scene overall. This also happens to be my brother as well. The red is actually his demon side coming out to those not knowing.

Step 3. With the image open, the first thing you should always do is to duplicate the image to a new layer. Name it whatever you feel like, I am going with, Red Eye base layer. To create a Duplicate layer, you can use one of several methods –

—- Go through Layers in the Menu Bar —- Click Duplicate Layer —- Name the layer and poof, it is now over in the Layers Pallet. Congratulations!
—- Or, right click the current layer in the Layer pallet—-  Click on Duplicate Layer —- Name said layer and poof you did it again!

I am sure there is a way to also set up a hotkey, or perhaps there is already one, I am just unfamiliar with it to be honest. Either way, the whole point of setting this up in a new layer is that you do not wish to ruin the original image. Its far easier to delete a new layer or to redo a mask, then to make the changes permanent on the original layer and then have to redo all of your hard work. Imagine if you will that you have just spent about 3 hours fixing up an image or painting a texture. You have done all of this on the base layer and have since painted over a color that you now wish to fix. Had you put each new color combination on its own layer, you would have had an easy time going back to that layer and changing the color or look of the texture. Now you either have to spend hours being meticulous or you have to restart from scratch. Its just easier to make any and all changes in their own layer, then group those at the end of the project to make things look nice and neat again. In my opinion.

Right click on the layer and click on Duplicate layer to bring up the text box. Name your new layers.

Another good practice to get into is always naming your layers as well. Its also a time saving practice that will make it easy for you to go back into your work and fix specific instances of work that you have done. For instance, its much easier to find a layer named Red Eye Removal, then it is to remember what fix you did on New Layer 282. Just Saying.

Step 4. With the new layer selected (it should be highlighted blue if it is selected) click the button under the layer pallet to make a new mask for this layer. Using a mask allows any of your changes to be isolated to whichever section of the image you so choose it to be applied to. In this case, the eyes.
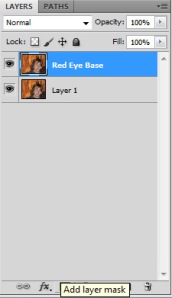
Add a Layer to the current Selection

Step 5. With a mask on the Red Eye Removal Layer, you are now able to click between the mask as well as the image you have there. With the mask selected, you should see on the left of the screen two boxes near the bottom of the tool bar, they should be White and black in color. If they are not fix it now. You can fix it by just clicking one of the boxes and just moving the color slider all the way to the the black or white color as needed. The reason you want black and white, is that is how Photoshop decides what is affected by the mask. Black means nothing is affected, white means its fully affected. Shades of grey mean its a mix of both.

Follow the arrow

Step 6. Now make sure the mask is pure white. If its currently black, you can easily make it white by inverting the color. Just click Control + I on the keyboard to do so. You do need to make sure the mask is selected, otherwise your image is going to look real funky for sure. Now with that done, select the image in the layer window, then go to Image—-Adjustments—-Desaturate. You should see the image turn all grayish in tone. This is what we want to happen. Now select the mask again and hit Control + I, to change it back to black. Everything should once again look like the original.
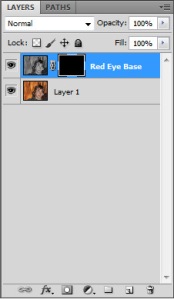
Image is gray, the mask is black

Step 7. With the mask layer selected,(make sure white is set as the color), select the Brush tool and make the size of the brush roughly about equal to the size of the red eye area. With the brush, check the brush settings and make it really soft, I use “0” as my brush hardness to be honest, I find the falloff for it to be quite nice and makes it look fairly realistic once it is all said and done. Now keep clicking with the brush over the red eye till the red is gone. We can refine this later via the mask setup.
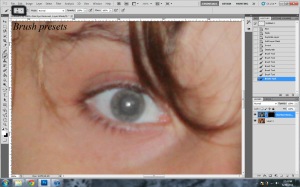
With underlayer desaturated, painting with white brings that through. Creepy eye now right?

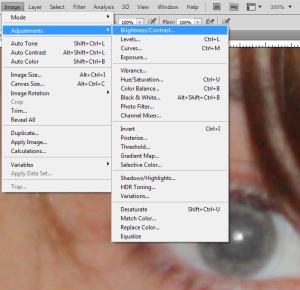
Step 8. The home stretch now. Now go back to the layers pallet and select the image portion of this layer. With that selected go to:
Image……Adjustments……Brightness/Contrast

Here move the brightness slider to the left till you are comfortable with the amount of black in the eye now. Its pretty simple really.
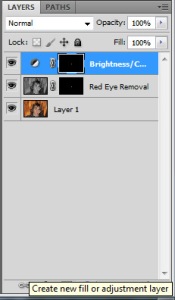
Step 9. With that done, you can now reselect the mask and edit it as needed. Black will take things away, white will add to the area effected. Fix it till its perfect then all you have to do is select the other eye using the same mask. Alternatively to this also, its also possible to have the brightness contrast in its own layer as well. To do so just go to the layers pallet and select add adjustment layer for brightness/contrast. By using this method, it will allow you to easily move the amount of black as often as need be, giving you overall more control. Now doing this though does require you to copy your mask to the new adjustment layer as well, to do this, click ctrl + alt and drag the mask up to the new one and click yes to replace mask. Done. Yours should look similar to this if you used this method here to add it to its own layer.


————————————————————————————————————————————————–

I use alot of shortcut keys when I use this program and many more. Some are basic ones that pretty much any windows application uses, others are more specialized for the program at hand. Either way, I am going to post them here for those who may wish to learn them as well. The reason I use them, is that, once you get used to them, they become second nature and greatly increase your work speed and efficiency at working in the program.

Shortcuts Used/Learned

Ctrl + N  = Creates a new Window inside of Photoshop
Ctrl + C = Copy Selection
Ctrl + V = Paste Selection
Ctrl + Z = Undo*
Ctrl + Alt + Z = Multiple undo*
Ctrl + Shift + Z = Undo an Undo (also move forward)*
Ctrl (and) + = Zoom In
Ctrl (and) – = Zoom out
[ = increase brush size
] = decrease brush size
Ctrl + Alt + (mouse drag) = Copy layer mask to new layer

Update 6 – 4 – 11

Well, life has dictated for a bit that I have not had a chance to post a new update for quite sometime in a matter of speaking. Gotten a few post up for sure, just not had time to post about whats been going on… but first, project and blog updates.


As I had posted before, the Force Pike Project is currently in the shopping stage. I have found links for all the pieces I need and am planning on ordering them here momentarily. Shipping is a bit high on a few pieces, so going to do a quick search to see if I can find as many as possibly through the same site so I can save on shipping cost. Granted it would be cheaper to just go to the stores to find these things, which I still might do, it would also require me to find more time to do this in. Right now I have just been putting this project together in the middle of the night when I am unable to sleep and have nothing better to do, usually around 3 to 4 in the morning to be more precise. Either way, once I get some more parts ordered, I shall be updating here with the project step by step as I go through this.

Click here for the most current update on the project and all the links for the shopping list as well.
https://tsukisramblings.wordpress.com/2011/05/28/personal-project-update-and-shopping-list/


The reviews I have gotten up since my last update.

Star Wars: Jedi Search by Kevin J. Anderson

Star Wars: Allegiance by Timothy Zahn


Reviews up and coming.

I am currently reading the Paths to Darkness books out of the forgotten realms by R.A. Salvatore. In addition I have mostly gotten the second book in the Champions of the force trilogy by Kevin J. Anderson nearly done, just really have to post it up and call it a day. So its as follows:

Star Wars: Dark Apprentice by Kevin J Anderson

Silent Blade by R. A. Salvatore


I am also greatly looking forward to the release of several more books in series that I have grown quite fond of. The first one I have made no denial of my interest in rereading. The book that has gotten this dork of a person hooked on reading Star Wars books for probably close to around 15 years now, Heir to the Empire’s 20th anniversary written by the ever so talented Timothy Zahn. This book releases on September 6th 2011… as long as it does not change this time at least.

In addition the last book in the Strain Trilogy, The Night Eternal, releases this October 25 2011. This is a joint effort between Guillermo Del Toro and Chuck Hogan. For all of those who are into Twilight, this one is not for you. The vampires don’t sparkle, they are not the type of person you take back to mom and dad for dinner. In fact, you wouldn’t get a chance to take them for dinner before you would be consumed yourself by the much more animalistic version of a vampire to date. I got interested in this series and bought it on a whim just because I am a fan of Del Toro’s work in directing movies. (Pans Labyrinth, Hellboy, The Orphanage among others). Check out the first book if you are into a good horror in a modern day setting. The Strain Book 1


Now on to further buisness. Just got back from vacation with my wife and have taken many pictures in addition to this. So I shall be posting a few of the favorites up just for my own benefit, but I had many pictures that had red eye as well. So after a bit of web searching and playing around in photoshop, I have worked up a way that will nicely remove red eye for anything outside of a complete eye close up. (the effect fails up close, but most pictures dont focus on the eye directly like that). I should be posting all of this up over the coming couple of days. So stay Tuned 🙂

Otherwise though, just had to many things going on that needed to be attended to in order for me to completely focus on keep this up to date. Now with those things taken care of, should be able to more readily keep this up to date with new content and many other things. So stay tuned 🙂