Tag Archive: Awesome


Yes, I ratted myself out. I start alot more then I finish. So far I think my success at failure is something around 100%. I got several projects in the works though this one I have some incentive to actually complete. Its for halloween 🙂

Utinni!!


Yes, I am being a Jawa. Not only am I being a jawa though, I am being a Jawa that has been plagued with gigantism. I have been ostracized from the clan which is why I am dressing alone. I am a wondering Jawa. Well, nearly. I will likely just have the cape and hood for this costume (so I will at least look like a Jawa) as well as the eyes. The cloth material, sadly, I just dont have the time to learn and create it myself this time. So we have asked one of my wifes coworkers to create it for me. Now the eyes is what I am working on, and as luck would have it, I think I have it pretty figured out.


For the basic mask I shall be using this:

http://www.spirithalloween.com/product/blank-male-mask/

Very simple and basic mask that I can cut up and get rid of the mouth portion of it. I just wont need that portion of which I shall use a deep black cloth to cover up the lower part of my face. On this mask I shall also be attaching some elastic bands of some sort to wrap around my head to hold it into place. Attached to this will also be black cloth wrapping up over the head as well and attaching to the back of the elastic bands via some sort of glue or so. This will hide my face in almost pure blackness 🙂

Now, the eyes. They will be a simple yellow/orange LED light. Pretty simple setup actually, will just attach a 9v battery, a resistor, and a LED light together and we are set. In addition thought to this setup, I want to try to attach a simple on and off switch so that I can turn the lights off when I am not using them. This who contraption will be attached to the mask as well, the battery, resistor and some wire will be ran along the elastic band and attach to the LED light that will be embedded in the mask just below the eyes of the mask. Now, I do still need to figure out something to attach to the LED base in order to sort of focus the light out a bit, think some concave piece will work but this is something I need to work on yet. Once all this is attached though, the head piece is pretty much complete and in theory I shall look similar to the picture above 🙂

Anyway, I hope to have this completed within a week. So looking forward to seeing something here soon 😉

As for Project Force Pike, it has hit a hurdle, I have some of the pieces I need, but one of the main pieces I had gotten is a bit to big and I am having to go around looking for a replacement for it, so this may take some time which for the time being, I am putting this one on hold for now.

3d Project, that is on hold till my new hopefully laptop arrives in the mail to replace this poopy one that I am on now. So hope that arrives in the next week or so as well 🙂

Having gone to school for 4 years to get into the field of 3D for a job, I have gone almost 5 months without touching any of my 3D related programs. I am a bit disappointing, but I honestly burnt myself out on them, not to mention the result of being unsuccessful finding a job that dealt with it as well as not feeling my skills were up to spec where I wanted to be. I have had computer issues galore, the programs themselves have been doing funny things, life has required me to not focus to much on it as well. I have an excuse for everything, but in the end, I was just burnt out with it and didnt feel I should continue on the path I had chosen. It had gotten me nowhere, but alas, its what I enjoy and I have been feeling that itch to try again.

Brings me to now. I am planning on retrying again. I have many training videos that I plan on rewatching, though I am planning on changing my workflow a bit here. Before, I would work almost non stop on something, sometimes literally for 8 hours a day straight. I realize how wrong I was to do this. This was the way I burnt myself out, all work and no play makes jack a dull boy. So I am switching things up a bit. I am planning on working in maybe half hour to an hour long increments. The length shall be dependent on how intense of a time I am having with the project, the harder and more focused I have to be on it, the sooner I shall take a break. Breaks lasting for about the same time I work on something, thinking at most to be a half hour or 45 minutes.

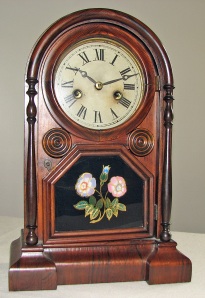
Anyway, back to what I plan on doing. I am once again going to be delving back into Architectural Visualization. I shall be starting small with a simple clock of sorts. This will be the type of clock you would see in a study, library or even on a shelf in the living room. One similar to the photo below.

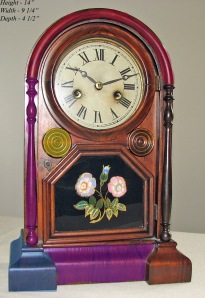
I have made some very general notes on the specific sections that will need to be modeled separately for this to be completed in a timely manner.

Starting at the bottom. The part colored in blue is a very simple base which can be easily copied over to create the other side. With that created, its an easy enough fix to cut those roughly in half, edit the inside edge shapes a bit and extrude and weld the center section between them which will give me the over all base.

Now the overall shape of the main clock box will be a simple box with a rounded top. Could create this a few ways, hinge from edge on the top, or just model a cylinder and delete half of it. Overall a very very basic shape.With the basic box created you then need to go and inset the edges a bit to give you the outer shell of this. Then extrude or delete the middle edges as it is a door for the front and is not needed at all. Or better yet, just detach that face and use it for the door mesh. Just would need to recreate the edge faces for the surface then inset and bevel out the lower shape and the actual clock edges. The detail work is mostly spline work and should not take too long once the shape is drawn out. Its at this point I might take some liberty with the design and change it up slightly, shall see once I get there.

As for how long this will take to get done? To hell if I know, I have tried created time lines in the past and something always goes wrong, so this piece will get done when it gets done. As I work on it I shall post blogs about the production of it, as this will be an addition to some models that I already have up for sale. Not sure if this will be a free model or if I will charge for it or not. I will decide that once I figure out if I like the work I had done or not. If I dont like it I will likely just make it a free model for download via my turbosquid account. If I do like it, then I shall work out a price point I think is fair and work from there.

This shall be modeled to scale, as such, the dimensions are on the image file for the notes.

Look for more here soon! (hopefully)

*1. Pool Cue at least 48″ in length – I actually found this at Dunham Sports here near me. You can check the website, but the actual stores have random sizes of pool sticks that I believe have been used before, or are just a cheaper brand. Either way, I got it for about 11 dollars instead of paying 25 plus on it. Yay for me!

*2. Backflow Prevention Valve – Only recently found a new source for this one, which is one of the things holding this project up. Anyway, I managed to get a few dollars shaved off the price here, so thinking I shall go with the new updated link here.

*3. Brass Craft Lavatory Handles

4. Multiflex Riser 1/2 x 4 inch – Finally found this bastard! Not sure why it took so long, just did a quick google search tonight and found one in 2 minutes. I guess perhaps I was spelling it wrong, but either way, I found one now! ***EDIT*** I have found a much cheaper option for this piece which I have now changed the link above to be the new one. Plus if I ever needed this site lets you order in bulk as well 😀

*5. 1″ x 3/4″ Copper Reducer

*6. Deleted for redundency

*7. 3/8″ wooden Dowel

*8. 7/8″ Black Plastic Endcap
Ordered for Free through Alliance Plastics.

*9. Black O-Ring Approx. 3/4″ (These can be found at home depot for dirt cheap it appears. Bought by the bag of 10 looking like for around a few dollars)

10. Seal off Adaptor  – Going to give this one a shot, I am not 100% sure its the right size, but the shape is right. If its the wrong size I shall post here.

*11. Bolts, Washers (these are easy to find at any home supply store, just need to figure out the sizes and buy them.)

*12. Black Corrugated Tubing

With all the pieces found now, I just got to order them! That will take me a bit, as there are a couple of different places I need to order from. I could probably save a little bit if I went to the stores to find all the pieces, but I really have little interest in doing that currently, just dont have the time to be honest.

With the pool stick, I need to start sanding it down to get rid of the color and finish, as well as any indentions as well. Then I will need to cut it down to the correct height also, that is the part that most worries me, as if I cut it wrong, I may have to buy a new pool stick, which would not be cool.

Also, picked up a few things to use as, err, reference? Or it could possibly be because I am just that big of a dork and just had to have it, I will let you decide.

Otherwise though, here is what the two pieces I currently have in my possession look like. Its a start towards completion 🙂

The blue cap on the top is the piece I got for free, worked out nicely as I didnt expect it to be soo tiny! Anyway, this will be the last update for a bit, going on vacation for a week, then once I come back hopefully have all sorts of pictures to post as well as getting time to finally get down and dirty towards this project.

See ya soon 🙂

Random Star Wars Goodness

Just a few videos that I have come across over time that I think is quite hilarious actually:

Vader Sessions

COPS: Stormtrooper — fills in the blanks for what really happened to Uncle Owen and Aunt Beru, How did the Imperials figure out what Jawas sold 3PO And R2? Watch and find out…

Chad Vader – What if Darth Vader was a shift manager at a grocery store?