Tag Archive: Photoshop


Ok, now before anyone says, “Hey, I know how to do this, there is a tool in photoshop for this! So why are you making this a tutorial?” Well simply put, the tool in my opinion does a decent job at removing red eye. True. I have also noticed, which perhaps is cause by my inexperience with the tool at hand, that it leaves a slight red ring at the edge of the eye that I never liked before. Also, once its done, there isnt a way to go and undo those down the pipeline if you so wished to do so. Either way, I am putting this up here as a reference more for myself as I sometimes will go months without seeing a Red eye in the pictures that I take, as such, I will often forget the exact procedure for doing so during that time.

Anyway, here we go…

Step 1. Open Photoshop, its self explanatory I know, but I am sure there are always those who would be lost afterwards if I did not post this step. Yes there are people that stupid out there, ask anyone who has ever worked tech support or phone service if you dont believe me.

Step 2. Open the image that has the red eye you wish to remove. For things like this I prefer to be zoomed in pretty close to the subject as most of the things you will be doing are over a very small space overall and you will need to get in close to be as accurate as possible.

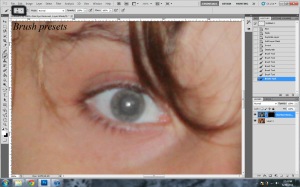
The image that I have opted to use for this. This is a small crop of a larger scene overall. This also happens to be my brother as well. The red is actually his demon side coming out to those not knowing.

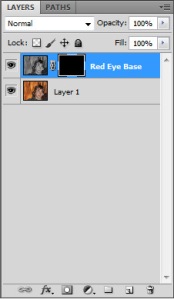
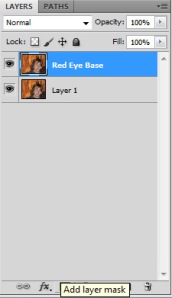
Step 3. With the image open, the first thing you should always do is to duplicate the image to a new layer. Name it whatever you feel like, I am going with, Red Eye base layer. To create a Duplicate layer, you can use one of several methods –

—- Go through Layers in the Menu Bar —- Click Duplicate Layer —- Name the layer and poof, it is now over in the Layers Pallet. Congratulations!
—- Or, right click the current layer in the Layer pallet—-  Click on Duplicate Layer —- Name said layer and poof you did it again!

I am sure there is a way to also set up a hotkey, or perhaps there is already one, I am just unfamiliar with it to be honest. Either way, the whole point of setting this up in a new layer is that you do not wish to ruin the original image. Its far easier to delete a new layer or to redo a mask, then to make the changes permanent on the original layer and then have to redo all of your hard work. Imagine if you will that you have just spent about 3 hours fixing up an image or painting a texture. You have done all of this on the base layer and have since painted over a color that you now wish to fix. Had you put each new color combination on its own layer, you would have had an easy time going back to that layer and changing the color or look of the texture. Now you either have to spend hours being meticulous or you have to restart from scratch. Its just easier to make any and all changes in their own layer, then group those at the end of the project to make things look nice and neat again. In my opinion.

Right click on the layer and click on Duplicate layer to bring up the text box. Name your new layers.

Another good practice to get into is always naming your layers as well. Its also a time saving practice that will make it easy for you to go back into your work and fix specific instances of work that you have done. For instance, its much easier to find a layer named Red Eye Removal, then it is to remember what fix you did on New Layer 282. Just Saying.

Step 4. With the new layer selected (it should be highlighted blue if it is selected) click the button under the layer pallet to make a new mask for this layer. Using a mask allows any of your changes to be isolated to whichever section of the image you so choose it to be applied to. In this case, the eyes.

Add a Layer to the current Selection

Step 5. With a mask on the Red Eye Removal Layer, you are now able to click between the mask as well as the image you have there. With the mask selected, you should see on the left of the screen two boxes near the bottom of the tool bar, they should be White and black in color. If they are not fix it now. You can fix it by just clicking one of the boxes and just moving the color slider all the way to the the black or white color as needed. The reason you want black and white, is that is how Photoshop decides what is affected by the mask. Black means nothing is affected, white means its fully affected. Shades of grey mean its a mix of both.

Follow the arrow

Step 6. Now make sure the mask is pure white. If its currently black, you can easily make it white by inverting the color. Just click Control + I on the keyboard to do so. You do need to make sure the mask is selected, otherwise your image is going to look real funky for sure. Now with that done, select the image in the layer window, then go to Image—-Adjustments—-Desaturate. You should see the image turn all grayish in tone. This is what we want to happen. Now select the mask again and hit Control + I, to change it back to black. Everything should once again look like the original.

Image is gray, the mask is black

Step 7. With the mask layer selected,(make sure white is set as the color), select the Brush tool and make the size of the brush roughly about equal to the size of the red eye area. With the brush, check the brush settings and make it really soft, I use “0” as my brush hardness to be honest, I find the falloff for it to be quite nice and makes it look fairly realistic once it is all said and done. Now keep clicking with the brush over the red eye till the red is gone. We can refine this later via the mask setup.

With underlayer desaturated, painting with white brings that through. Creepy eye now right?

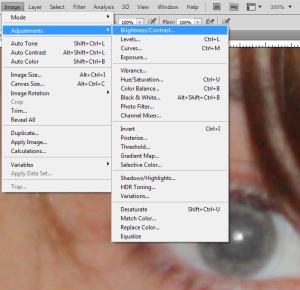
Step 8. The home stretch now. Now go back to the layers pallet and select the image portion of this layer. With that selected go to:
Image……Adjustments……Brightness/Contrast

Here move the brightness slider to the left till you are comfortable with the amount of black in the eye now. Its pretty simple really.

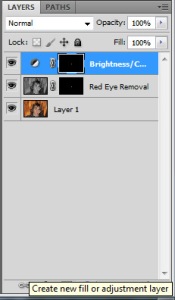
Step 9. With that done, you can now reselect the mask and edit it as needed. Black will take things away, white will add to the area effected. Fix it till its perfect then all you have to do is select the other eye using the same mask. Alternatively to this also, its also possible to have the brightness contrast in its own layer as well. To do so just go to the layers pallet and select add adjustment layer for brightness/contrast. By using this method, it will allow you to easily move the amount of black as often as need be, giving you overall more control. Now doing this though does require you to copy your mask to the new adjustment layer as well, to do this, click ctrl + alt and drag the mask up to the new one and click yes to replace mask. Done. Yours should look similar to this if you used this method here to add it to its own layer.


————————————————————————————————————————————————–

I use alot of shortcut keys when I use this program and many more. Some are basic ones that pretty much any windows application uses, others are more specialized for the program at hand. Either way, I am going to post them here for those who may wish to learn them as well. The reason I use them, is that, once you get used to them, they become second nature and greatly increase your work speed and efficiency at working in the program.

Shortcuts Used/Learned

Ctrl + N  = Creates a new Window inside of Photoshop
Ctrl + C = Copy Selection
Ctrl + V = Paste Selection
Ctrl + Z = Undo*
Ctrl + Alt + Z = Multiple undo*
Ctrl + Shift + Z = Undo an Undo (also move forward)*
Ctrl (and) + = Zoom In
Ctrl (and) – = Zoom out
[ = increase brush size
] = decrease brush size
Ctrl + Alt + (mouse drag) = Copy layer mask to new layer

Update 6 – 4 – 11

Well, life has dictated for a bit that I have not had a chance to post a new update for quite sometime in a matter of speaking. Gotten a few post up for sure, just not had time to post about whats been going on… but first, project and blog updates.


As I had posted before, the Force Pike Project is currently in the shopping stage. I have found links for all the pieces I need and am planning on ordering them here momentarily. Shipping is a bit high on a few pieces, so going to do a quick search to see if I can find as many as possibly through the same site so I can save on shipping cost. Granted it would be cheaper to just go to the stores to find these things, which I still might do, it would also require me to find more time to do this in. Right now I have just been putting this project together in the middle of the night when I am unable to sleep and have nothing better to do, usually around 3 to 4 in the morning to be more precise. Either way, once I get some more parts ordered, I shall be updating here with the project step by step as I go through this.

Click here for the most current update on the project and all the links for the shopping list as well.
https://tsukisramblings.wordpress.com/2011/05/28/personal-project-update-and-shopping-list/


The reviews I have gotten up since my last update.

Star Wars: Jedi Search by Kevin J. Anderson

Star Wars: Allegiance by Timothy Zahn


Reviews up and coming.

I am currently reading the Paths to Darkness books out of the forgotten realms by R.A. Salvatore. In addition I have mostly gotten the second book in the Champions of the force trilogy by Kevin J. Anderson nearly done, just really have to post it up and call it a day. So its as follows:

Star Wars: Dark Apprentice by Kevin J Anderson

Silent Blade by R. A. Salvatore


I am also greatly looking forward to the release of several more books in series that I have grown quite fond of. The first one I have made no denial of my interest in rereading. The book that has gotten this dork of a person hooked on reading Star Wars books for probably close to around 15 years now, Heir to the Empire’s 20th anniversary written by the ever so talented Timothy Zahn. This book releases on September 6th 2011… as long as it does not change this time at least.

In addition the last book in the Strain Trilogy, The Night Eternal, releases this October 25 2011. This is a joint effort between Guillermo Del Toro and Chuck Hogan. For all of those who are into Twilight, this one is not for you. The vampires don’t sparkle, they are not the type of person you take back to mom and dad for dinner. In fact, you wouldn’t get a chance to take them for dinner before you would be consumed yourself by the much more animalistic version of a vampire to date. I got interested in this series and bought it on a whim just because I am a fan of Del Toro’s work in directing movies. (Pans Labyrinth, Hellboy, The Orphanage among others). Check out the first book if you are into a good horror in a modern day setting. The Strain Book 1


Now on to further buisness. Just got back from vacation with my wife and have taken many pictures in addition to this. So I shall be posting a few of the favorites up just for my own benefit, but I had many pictures that had red eye as well. So after a bit of web searching and playing around in photoshop, I have worked up a way that will nicely remove red eye for anything outside of a complete eye close up. (the effect fails up close, but most pictures dont focus on the eye directly like that). I should be posting all of this up over the coming couple of days. So stay Tuned 🙂

Otherwise though, just had to many things going on that needed to be attended to in order for me to completely focus on keep this up to date. Now with those things taken care of, should be able to more readily keep this up to date with new content and many other things. So stay tuned 🙂


The problem I came across the other day was that we had been out all day taking pictures of a bunch of flowers. I came home after taking some 250+ pictures all taken in camera RAW. Awesome idea, but when I came home, I didn’t realize how tedious it would be to just look at all of the images to see which ones I liked. On top of being time consuming, I would also have to then take into Photoshop all of the images I liked, edit them and re-save them as a JPEG or whatever other file type I wished for posting purposes.

Knowing it was possible to process all of the files automatically, but yet, not knowing how to accomplish that goal myself, I went about online to figure out how to do it. The problem came though that I was really unsure of what the process was called. So I spent some time looking around and finally came across something that gave me the basics but didnt really tell me everything. So I sort of had to just guess my way through it.

Anyway, to save myself sometime, figured I would post it here for later use, as well as hopefully helping anyone else who may need it as well.

Step 1: Obviously the first step is to open Photoshop up. (assuming at least that photoshop is the program you are using. If its not, why are you here then? )

Step 2: You need to create the action over in the actions flyout. If you do not see the action flyout, you can bring it back up by clicking on the Window tab in the toolbar and activating the Actions option. Or for those like myself who prefer shortcut keys ALT + F9 will also bring it back up.

Step 3: The next thing I would do is to create a new folder for your custom actions. So under the actions flyout, click the new folder option.

Step 4: With the new folder created, click on it to highlight it, then selct the create new action option.

Name – Self Explanatory

Set – This is the folders that you have created for your actions. If your custom action folder is not selected, select it here now.

Function key – I have not used this myself, but I would imagine you could use this option to fast track the specified action. In the case of this type of action here, I don’t imagine this would be too helpful. Perhaps in the case if you were creating custom selections for creating perhaps a border for your images, it might be a bit more helpful for something like that.

Color – I have yet to figure out what this actually does. I am guessing perhaps if you are using an action to create a background piece that perhaps it is used for the background color? I am really not sure.

When you have everything completed, click the record button

Step 6: Now this is important. From here on, everything you click will be recorded and added to the action. So make sure that anything you want to add to this action, you go through in the EXACT order it should be. Granted things can be edited later, but its just good practice to try to get it right the first time then to have to spend all the extra time editing later.

For the case of this action, all I wanted was for an action to open Camera RAW images then to resave them as JPEG.

From this point I opened up the first image that I wanted to be done. The camera RAW options opened up inside of photoshop. As I mentioned before, everything you edit will be done to EACH image. So in the case of this, I figure less is more. I don’t want to go through and edit the exposure and everything else that I would normally. Those edits might not be accurate from image to image. So in this case, the only thing I opted to change was the white balance from “As Shot” to “Cloudy”. I liked the look of that option, so I went with it. I then precedded to click on the Open in Photoshop option.

Now with Photoshop open, the image itself is fine. If I wanted to change the size of the image to a smaller format, I could do that here first. In this case though, all I wish to do is to resave it. So I go to File> Save As> Select JPEG as my file type, name my file.

The final thing I need to do now is to close the file out and leave just Photoshop Open. Done.

Click Stop Recording in the Actions flyout. You will now see the Action you created in the folder you opted to attach it to.

Step 7: Now go to File> Automate> Batch and look at the options here.

The Play Options:

Set – Once again, the action folder that you are using, in this case, Custom Actions

Action – the name of the action you are using.

Source Options:

Source – Folder is what you will need for this option. I have not found a need for the other options so far.

Choose: This option is the folder in which all of your camera raw pictures are located. Ideally I believe they should be somewhere on your harddrive and not inside of the memory card. Doing this I believe would save time and also not have the chance of corrupting your memory card if something went wrong.

Override Action “Open” Command: Unsure

Include all Sub-Folders: Have all of your images from a weeks worth of photoshoots in one folder seperated in their own subfolders, click this and it will go through each subfolder one after the other.

Suppress File Open Options Dialogue box: I am not 100%, but I believe this option stops you from having to manually click an options that happen during the opening of the file. For instance, I know some images might have a different color profile then the native setting inside of photoshop, so when this happens, photoshop always asks me if I wish to convert the profile to that used by the program, or that inset with the camera RAW file. Having this command selected will bypass this and I think it will just stick with whatever you had set during the original recording.

Suppress Color Profile Warnings: Unsure

Destination Options:

Destination – Once again, I opted for Folder as my option. I have not found a need for the rest of them yet.

Choose – The folder you are putting the new files into. I created a folder on my desktop called JPEGs, which is where I opted to save all of the converted files.

Override Action “Save As” Command: This makes it so you don’t have to keep selecting all of the options to save a file. You don’t need to change the name or the file type or anything.

File Naming – Now I am not 100% sure what all of the saving options use here. I know with the first section, I opted to use the 3 digit seriel number as my file name. This would make all of my files look like this as they save: 001, 002, 003, etc etc. The option to the right of it I chose extension. This option will take the File Extension, in this case JPEG, that you originally saved the file to during the action recording as the file type for all of your images.

Step 8: Click ok. This will start your batch process. Now walk away from the computer and do what ever needs to be done while the computer does all of the work. At any time say you forgot to set something up, just hit esc on your computer and you can cancel the Batch process when needed.

Now I know this process works inside of Photoshop, but I am unsure it works inside of Lightroom or another photo editing software. At least with Lightroom, since it is an Adobe product, I am sure there is the chance of a similar procedure, but as I do not have access to the program I am unsure. If anyone has it and knows how to do a batch process in it, please let me know as I am curious now. Also, if I have forgotten a step, or if I explained something wrong, please let me know! I am still learning alot of this stuff myself, so any thing I post is just how I understand things as of now. Thanks again 🙂