Ok, now before anyone says, “Hey, I know how to do this, there is a tool in photoshop for this! So why are you making this a tutorial?” Well simply put, the tool in my opinion does a decent job at removing red eye. True. I have also noticed, which perhaps is cause by my inexperience with the tool at hand, that it leaves a slight red ring at the edge of the eye that I never liked before. Also, once its done, there isnt a way to go and undo those down the pipeline if you so wished to do so. Either way, I am putting this up here as a reference more for myself as I sometimes will go months without seeing a Red eye in the pictures that I take, as such, I will often forget the exact procedure for doing so during that time.
Anyway, here we go…
Step 1. Open Photoshop, its self explanatory I know, but I am sure there are always those who would be lost afterwards if I did not post this step. Yes there are people that stupid out there, ask anyone who has ever worked tech support or phone service if you dont believe me.
Step 2. Open the image that has the red eye you wish to remove. For things like this I prefer to be zoomed in pretty close to the subject as most of the things you will be doing are over a very small space overall and you will need to get in close to be as accurate as possible.

The image that I have opted to use for this. This is a small crop of a larger scene overall. This also happens to be my brother as well. The red is actually his demon side coming out to those not knowing.
Step 3. With the image open, the first thing you should always do is to duplicate the image to a new layer. Name it whatever you feel like, I am going with, Red Eye base layer. To create a Duplicate layer, you can use one of several methods –
—- Go through Layers in the Menu Bar —- Click Duplicate Layer —- Name the layer and poof, it is now over in the Layers Pallet. Congratulations!
—- Or, right click the current layer in the Layer pallet—- Click on Duplicate Layer —- Name said layer and poof you did it again!
I am sure there is a way to also set up a hotkey, or perhaps there is already one, I am just unfamiliar with it to be honest. Either way, the whole point of setting this up in a new layer is that you do not wish to ruin the original image. Its far easier to delete a new layer or to redo a mask, then to make the changes permanent on the original layer and then have to redo all of your hard work. Imagine if you will that you have just spent about 3 hours fixing up an image or painting a texture. You have done all of this on the base layer and have since painted over a color that you now wish to fix. Had you put each new color combination on its own layer, you would have had an easy time going back to that layer and changing the color or look of the texture. Now you either have to spend hours being meticulous or you have to restart from scratch. Its just easier to make any and all changes in their own layer, then group those at the end of the project to make things look nice and neat again. In my opinion.

Right click on the layer and click on Duplicate layer to bring up the text box. Name your new layers.
Another good practice to get into is always naming your layers as well. Its also a time saving practice that will make it easy for you to go back into your work and fix specific instances of work that you have done. For instance, its much easier to find a layer named Red Eye Removal, then it is to remember what fix you did on New Layer 282. Just Saying.
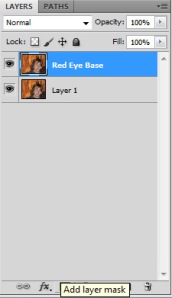
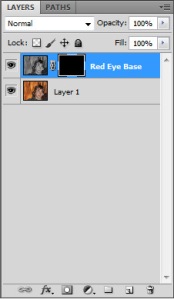
Step 4. With the new layer selected (it should be highlighted blue if it is selected) click the button under the layer pallet to make a new mask for this layer. Using a mask allows any of your changes to be isolated to whichever section of the image you so choose it to be applied to. In this case, the eyes.
Step 5. With a mask on the Red Eye Removal Layer, you are now able to click between the mask as well as the image you have there. With the mask selected, you should see on the left of the screen two boxes near the bottom of the tool bar, they should be White and black in color. If they are not fix it now. You can fix it by just clicking one of the boxes and just moving the color slider all the way to the the black or white color as needed. The reason you want black and white, is that is how Photoshop decides what is affected by the mask. Black means nothing is affected, white means its fully affected. Shades of grey mean its a mix of both.
Step 6. Now make sure the mask is pure white. If its currently black, you can easily make it white by inverting the color. Just click Control + I on the keyboard to do so. You do need to make sure the mask is selected, otherwise your image is going to look real funky for sure. Now with that done, select the image in the layer window, then go to Image—-Adjustments—-Desaturate. You should see the image turn all grayish in tone. This is what we want to happen. Now select the mask again and hit Control + I, to change it back to black. Everything should once again look like the original.
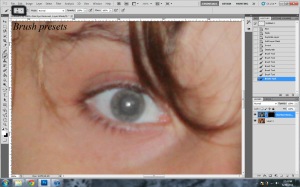
Step 7. With the mask layer selected,(make sure white is set as the color), select the Brush tool and make the size of the brush roughly about equal to the size of the red eye area. With the brush, check the brush settings and make it really soft, I use “0” as my brush hardness to be honest, I find the falloff for it to be quite nice and makes it look fairly realistic once it is all said and done. Now keep clicking with the brush over the red eye till the red is gone. We can refine this later via the mask setup.
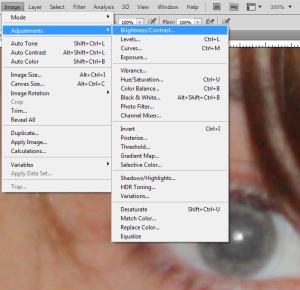
Step 8. The home stretch now. Now go back to the layers pallet and select the image portion of this layer. With that selected go to:
Image……Adjustments……Brightness/Contrast
Here move the brightness slider to the left till you are comfortable with the amount of black in the eye now. Its pretty simple really.
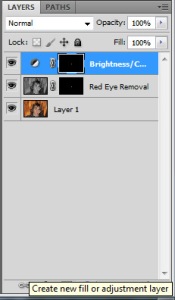
Step 9. With that done, you can now reselect the mask and edit it as needed. Black will take things away, white will add to the area effected. Fix it till its perfect then all you have to do is select the other eye using the same mask. Alternatively to this also, its also possible to have the brightness contrast in its own layer as well. To do so just go to the layers pallet and select add adjustment layer for brightness/contrast. By using this method, it will allow you to easily move the amount of black as often as need be, giving you overall more control. Now doing this though does require you to copy your mask to the new adjustment layer as well, to do this, click ctrl + alt and drag the mask up to the new one and click yes to replace mask. Done. Yours should look similar to this if you used this method here to add it to its own layer.
————————————————————————————————————————————————–
I use alot of shortcut keys when I use this program and many more. Some are basic ones that pretty much any windows application uses, others are more specialized for the program at hand. Either way, I am going to post them here for those who may wish to learn them as well. The reason I use them, is that, once you get used to them, they become second nature and greatly increase your work speed and efficiency at working in the program.
Shortcuts Used/Learned
Ctrl + N = Creates a new Window inside of Photoshop
Ctrl + C = Copy Selection
Ctrl + V = Paste Selection
Ctrl + Z = Undo*
Ctrl + Alt + Z = Multiple undo*
Ctrl + Shift + Z = Undo an Undo (also move forward)*
Ctrl (and) + = Zoom In
Ctrl (and) – = Zoom out
[ = increase brush size
] = decrease brush size
Ctrl + Alt + (mouse drag) = Copy layer mask to new layer

